
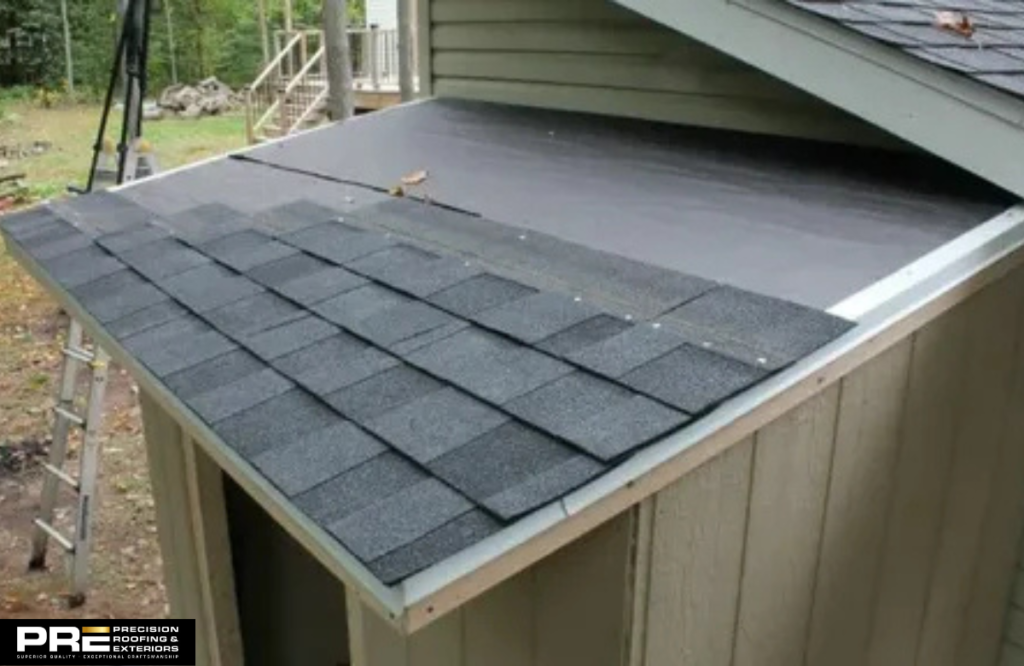
You can shingle a single slope or lean-to shed roof, but only if the slope and roof deck are suitable for asphalt shingles. This means the minimum slope for asphalt shingles is 2:12. Additional underlayment or installation measures may be required on lower slopes. Check the roof deck before installation. Make sure you install the drip edge and underlayment properly. If the roof meets an existing wall, the connection needs proper flashing to help prevent water from getting behind the roofing.
Key Takeaways
- Determine the roof slope before selecting asphalt shingles. The slope of a roof may have to be different if it is not as steep as the product calls for, to accommodate a different roofing system.
- Replace any damaged or weak roof decking before you add new shingles.
- Install the drip edge, underlayment, and starter strip according to the roofing manufacturer’s instructions.
- Pay close attention to the wall connection when shingling a lean-to shed roof. Poor flashing can allow water behind the roofing.
- Inspect the shingles, roof edges, nails, and flashing after installation.
What Tools and Materials Do You Need to Shingle a Lean-To Shed Roof?
A small shed roof usually needs basic roofing tools and materials. Have everything ready before starting so you do not need to stop during installation.
- Asphalt shingles
- Starter shingles or starter strips
- Roofing underlayment
- Drip edge
- Roofing nails
- Hammer or compatible nail gun
- Utility knife
- Measuring tape
- Chalk line
- Straight edge
- Flashing for a roof-to-wall connection, when required
- Ladder and appropriate safety equipment
Check with the shingle manufacturer’s instructions before installation. The nail placement, underlayment requirements and other details will vary from product to product.
How Do You Prepare a Lean-To Shed Roof for Shingles?
The roof must be prepared before the first shingle is put on. Check the deck, slope, existing roofing and roof edges before you cover the surface.
Inspect the Roof Deck
Check the roof deck for soft areas, damaged boards, sagging areas, or indications of water damage. A damaged or unstable deck can affect the performance of the shingles installed above it. Replace weak or rotten sections before installing new roofing. Remove loose nails and debris from the surface as well. The deck should be clean and dry before the underlayment is installed.
Check the Roof Slope
Before deciding which shingles to use, find out the pitch of your roof. A 2:12 slope means that the roof will rise 2 inches for every 12 inches you go horizontally. Most asphalt shingles need a minimum 2/12 slope. Lower slopes may require additional underlayment and installation requirements. Read the instructions for the shingles you want to use.
Remove Old Roofing if Necessary
If the roof deck requires inspection, or if the existing shingles are badly damaged, the old roofing may have to be stripped. When you pull off the old roofing, you can see damaged wood or old flashing. Remove any loose nails after the old roofing is removed. Clear the deck before installing the new materials. Local requirements may affect whether new shingles can be installed over an existing layer.
Prepare the Roof Edges and Wall Connection
Check the eave and rake edges before installing the shingles. They should be straight and secure. The upper edge needs additional attention when the roof meets an existing wall. Water can enter this area if the flashing is not installed correctly. Prepare the wall connection before covering the surrounding roof with shingles. The connection becomes harder to correct after the surrounding roofing is installed.
Step-by-Step Guide to Shingling a Lean-To or Single-Slope Shed Roof
Shingles are placed starting at the lower edge of the roof and moving toward the upper edge. Follow the manufacturer’s instructions for each part of the installation.
Step 1: Install the Drip Edge Along the Eave
Begin at the bottom edge of the roof. This is where the rainwater exits the roof surface. Install the drip edge along the eave and nail it in place as instructed in the roofing instructions. As you work across the roof, keep the pieces straight.
Step 2: Install the Roofing Underlayment
Install the specified underlayment over the roof deck. Install the underlayment from the lower edge toward the upper edge of the roof. Make a note of the overlaps and method of fastening required. Make sure the underlayment is smooth and wrinkle-free before installing the shingles. Low-slope roofs may require additional underlayment protection. Verify the shingle manufacturer’s requirements before installation.
Step 3: Install Drip Edge Along the Rake Edges
With the underlayment installed, the drip edge is installed along the sides of the roof. Secure it tightly; keep the pieces in line. A crooked drip edge can have an impact on the finished look of the shingles. Check the edge as you work instead of waiting to check it at the end.
Step 4: Snap Chalk Lines for Shingle Alignment
Chalk lines help keep the shingle courses straight. Chalk lines help keep each shingle course properly aligned across the roof. Measure the required shingle exposure before marking the lines. Follow the manufacturer’s layout instructions rather than estimating the spacing.
Step 5: Install the Starter Strip
Place the starter strip along the lower edge of the roof. It provides the starting point for the first visible course. Keep the strip straight and fasten it as instructed. Check its position before moving to the first course of shingles.
Step 6: Install the First Course of Shingles
Install the first course above the starter strip. Keep shingles aligned with the chalk line and follow the required exposure. Check the first row before you continue. If the first course is not level, the courses above it can become misaligned. Secure each shingle in accordance with the manufacturer’s recommendations.
Step 7: Continue Shingling Up the Roof
Continue installing the shingles one course at a time. Follow the necessary exposure and offset pattern. Check alignment as you go up. Small changes in one row are more obvious over several courses. Overlap shingles properly so water flows over the surface and not underneath the roof.
Step 8: Nail Each Shingle Correctly
Use the type and location of nails specified by the shingle manufacturer. Drive the nails firmly without damaging the shingles. A nail driven too deep can damage a shingle. A nail that is not driven far enough may not hold it properly. Pay attention to the required fastening pattern around edges and corners.
Step 9: Trim Shingles Along the Rake Edges
When the courses are on the sides of the roof, trim the shingles at the rake edges. Use a sharp utility knife for clean cuts. Do not damage the drip edge that is under the shingles. Check the finished edge as you go so you can correct any uneven spots.
Step 10: Finish the Upper Roof Edge
The finishing method for the upper edge depends on the shed roof’s construction. At the intersection of a roof and a wall, the flashing should channel water away from the junction. If the top edge is open, complete it according to the manufacturer’s instructions. Sealant is no substitute for proper flashing. The sealant may be part of the roofing system, but it should not be used to replace the required flashing at the intersection.
How Is a Lean-To Roof Different From a Single-Slope Shed Roof?
The two roof styles can have a similar slope and shingle layout. The main difference is often where the roof connects to the rest of the structure.
Where the Roof Meets an Existing Wall
A lean-to roof commonly connects to an existing building or wall. Water running down the wall can reach this connection. A freestanding single-slope shed may not have the same wall connection. This can make the upper edge simpler to finish.
Flashing Requirements at the Wall Connection
Flashing helps move water away from the point where the roof meets the wall. It needs to be installed correctly before the surrounding roofing is completed. The exact flashing method depends on the construction and roofing materials. Follow the instructions for the specific roofing system.
Differences in Roof Layout and Drainage
Both roof styles direct water toward the lower edge. The runoff still requires a clear exit from the shed. If you do install gutters, make sure that the water runs into the gutter and not behind it. The drip edge should also be compatible with the drainage system.
What Should You Check After Shingling a Lean-To Roof?
Installation problems can be identified during final inspection before leaks occur. Check the roof from different angles on the roof and examine the points where the materials come together closely.
- Make sure the shingle courses are straight.
- Look for loose, lifted, or damaged shingles.
- Check that the drip edge is secure along the eave and rake edges.
- Look for exposed or incorrectly placed nails.
- Inspect the flashing where the roof meets the wall.
Do not skip the final inspection because the roof is small. Small gaps or loose materials can still allow water into the structure.
Conclusion
A single-slope shed roof can be simple to shingle if the slope and roof deck are suitable for asphalt shingles. Shingles are installed from the bottom of the roof and work their way up. All courses must be properly aligned and secured. If the shed is attached to an existing building, be careful
Precision Roofing offers professional roofing advice and installation. Let us help you with your project. Following the correct steps when shingling a lean-to shed roof can help protect the structure from rain and other weather.
Frequently Asked Questions
What is the minimum roof slope for shingles on a lean-to shed?
Many asphalt shingles require a minimum pitch of 2:12. Lower slopes might need additional underlayment. Look at the manufacturer’s directions for the type of shingles you want to install.
Can you shingle a single-slope shed roof yourself?
A small shed roof can be a DIY job if the roof is in good condition and has a suitable slope. But even working at height has safety risks. A professional may be a better choice if the roof has damaged decking, a low slope, or a difficult wall connection.
How do you prevent leaks where a lean-to roof meets a wall?
Provide proper flashing at the intersection of the roof and wall. The flashing should be integral to the roofing system and should shed water away from the joint. Do not rely on the sealant alone to protect the connection.